Welcome to the Kit.com pricing review 2026
I started my email marketing with ConvertKit—now rebranded to Kit.
I built my list, created an automation sequence, and have a real feel for where Kit performs and what it falls short on.
So, when I talk about kit pricing, I don’t just read the pricing page but speak from experience.
ConvertKit rebranded to Kit in 2024, but the product remains the same, even with more advanced features.
But what has changed is the price. In September, 2025, Kit increased the prices substantially— the creator plan was $15/month, but now the current price starts from $39 per month, almost double the old price.
That’s a big shift.
And if you’re a blogger, marketer, or content creator trying to decide if Kit is still worth it in 2026, you’re in the right place.
I’ll break down Kit plans, tell you exactly what each plan costs based on subscribers, and compare it with other email marketing tools in the market.
Here’s what I’ll cover:
- Kit’s pricing plans (free, Creator, Creator Pro)
- Pricing tables by subscriber count
- Kit vs competitors comparison
- Is Kit worth the price in 2026?
How much does kit.com cost per month?

Kit.com’s pricing in 2026 has three plans: Newsletter, Creator, and Creator Pro.
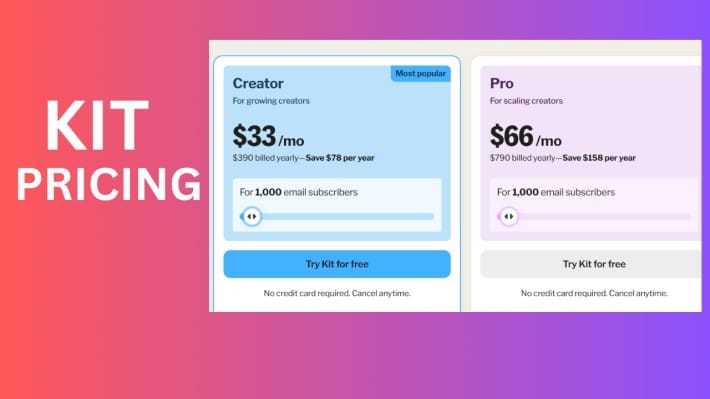
The Kit creator plan starts at $39/month (or $33/month billed annually) for 1,000 subscribers.
The Creator Pro starts at $79 per month or $66/month when billed annually for 1k subscribers.
Both the creator and pro plan prices increase as the number of contacts grows.
Table of Contents
Kit.com Pricing Review 2026: An Overview
| Feature | Newsletter | Creator | Creator Pro |
| Monthly price | $0 | From $39/month | From $79/month |
| Annual price | $0 | From $33/month ($390/yr) | From $66/month ($790/yr) |
| No of Subscribers | Up to 10,000 | From 1,000 | From 1,000 |
| Broadcasts Email | Unlimited | Unlimited | Unlimited |
| Landing pages & forms | Unlimited | Unlimited | Unlimited |
| Visual automation | 1 basic | Unlimited | Unlimited |
| Email sequences | One | Unlimited | Unlimited |
| Users | One | Two | Unlimited |
| Remove Kit branding | No | Yes | Yes |
| External integrations | No | Yes | Yes |
| Smart recommendations | No | Yes | Yes |
| Facebook custom audiences | No | No | Yes |
| Newsletter referral system | No | No | Yes |
| Subscriber engagement scoring | No | No | Yes |
| Deliverability reporting | No | No | Yes |
| Priority support | No | No | Yes |
| Sell digital products | No | No | Yes |
| Free trial | — | 14 days | 14 days |
| Money-back guarantee | — | 30 days | 30 days |
Kit pricing and plans can help you with the best features to grow your email marketing business.
It offers features to collect emails from your visitors or run a paid email newsletter.
Before you start, you need to understand how much the Kit costs.
The in-depth details about the Kit pricing and plans below will help you choose the best one for your needs.
What Is Kit?

Kit.com is an email marketing platform for content creators such as bloggers, marketers, YouTubers, and online business owners.
The platform helps users grow their audience, engage with subscribers, and monetize their content using automation, opt-in forms, and landing pages.
Kit.com Pricing And Plans

There are three different Kit pricing plans: the newsletter (free), Creator ($25/month), and Creator Pro ($50/month).
The Kit price is based on the number of subscribers. So, any plan you choose has the same core features except for the free newsletter.
- Unlimited, customizable CTAs & signup forms
- premium landing page templates
- Unlimited traffic
- Customizable domain setup
- Mobile responsive designs
- Send email broadcasts
- Subscriber tagging
- Reporting
- Visual automation funnels
- Automated email sequences
- 90+ direct integrations
- API
- Premium support
- Free migration from another tool
Kit.com Plans Cost Per Month
Below is the Kit email pricing for each of the plans.
Newsletter Free Plan
The newsletter is a free plan that allows up to 10,000 subscribers without requiring you to enter your credit card.
The Kit newsletter is excellent if you’re new to email marketing; it will help you learn how it works before investing your money.
Kit’s mission is to help you earn a living, and by allowing you to create a free account, they are removing a roadblock for beginner creators towards building a successful email marketing business.
What’s included for free:
- Up to 10,000 subscribers
- Unlimited email broadcasts
- Create unlimited landing pages
- Design unlimited forms
- Audience tagging and segmentation
- Sell digital products and subscriptions
- 1 basic visual automation
- 1 email sequence
- 24/7 support
Kit takes a 3.5% + $0.30 transaction fee when selling digital products with a free account.
Creator Plan starts from $39/month
The Kit creator plan is best for bloggers, business owners, and content creators who want to automate their email marketing to grow their businesses.
The Creator plan features include the following:
- Unlimited visual automations
- Unlimited email templates
- No Kit branding
- Third-party integrations (With over 90 marketing tools)
- Smart recommendations
- 2 users
- Free migration with over 5,000 subscribers
Kit creator plan pricing starts at $39/month for 1k subscribers on a monthly subscription or $33/month ($390/year) billed annually.
You can then save about $78 per year, which is 2 months free.
Creator Plan Price Based on Subscriber
| Subscribers | Monthly Cost | Annual price | Annual saving |
| 1,000 | $39/month | $33/month | $78/year |
| 3,000 | $59/month | $49/month | $118/year |
| 5,000 | $89/month | $75/month | $178/year |
| 8,000 | $109/month | $91/month | $218/year |
| 10,000 | $139/month | $116/month | $278/year |
| 15,000 | $169/month | $141/month | $338/year |
| 25,000 | $199/mo | $166/month | $398/year |
You get 2 months free for an annual payment; that is 16%
Kit Creator Pro Starts From $79/month
The Creator Pro is for creators who have a growing business and want to scale their audience with analytics and growth tools.
It comes with everything in Creator, plus:
- Subscriber engagement scoring
- Facebook custom audiences
- Newsletter referral system
- Deliverability reporting
- Insights and data
- Priority support
- Unlimited users
The price starts at $79 per month for 1k subscribers or $66 per month when billed annually—that saves you $158 a year.
Check the official Pricing page
Creator Pro Plan Cost Per Subscriber
| Subscribers | Monthly Price | Annual price | Annual saving |
| 1,000 | $79/month | $66/mo | $158/yr |
| 3,000 | $111/month | $93/mo) | $222/yr |
| 5,000 | $139/month | $116/mo | $278/yr |
| 8,000 | $167/month | $139/mo | $334/yr |
| 10,000 | $199/month | $166/mo | $398/yr |
| 15,000 | $239/month | $199/mo | $478/yr |
| 25,000 | $279/month | $233/mo | $558/yr |
Kit Annual Pricing Plans
When you subscribe to the yearly payment, you save 2 months while only paying for 10 months instead of 12.
For Creator Plan
The price starts at $25 for 1,000 subscribers instead of $29, while the Creator Pro starts at $50. You can subscribe to the yearly payment for two months for free.
1000 Subscribers
- Monthly cost: $29 per month
- Annual fee: $25 per month
- Yearly Discount: $48
- You will pay $290 annually for 1000 subscribers
3,000 subscribers
- Monthly price: $49 a month
- Yearly fee: $41 per month
- Annual Discount: $96
- You pay $490 for up to 3,000 subscribers
5,000 Subscribers
- $79 per month for 5,000 subscribers.
- The yearly payment is $64 per month.
- $790 annually for 5,000 subscribers
- Access to all the features
Creator Pro Annual Payment
1000 Subscribers
- You will pay $590 for 1000 subscribers
- Monthly cost: $59 per month
- Annual fee: $50 per month
- Yearly Discount: $118
>> Check the Kit pricing calculator
Final Thought On Kit.com Pricing Review
I hope this Kit pricing review helps you understand the cost of building your business with the tool.
Kit offers a flexible pricing structure tailored to your needs as a content creator or blogger, whether you’re a beginner or want to scale your business.
The Newsletter plan is great for beginners who just want to build an audience without a paid plan.
The Creator plan offers powerful tools for growing and engaging subscribers, while the Creator Pro plan provides advanced features such as scoring, Facebook custom audiences, and advanced analytics.
If you want to grow your audience and build a successful list, try the Kit email marketing tool now.
Kit Pricing Plans: FAQ
Below are some of the frequently asked questions about the Kit price.
Is Kit free?
Yes, Kit has both a free plan and a paid plan. You can start with the free plan and later upgrade to a paid one when your audience grows.
The Kit free plan includes unlimited forms and landing pages. You can also broadcast emails sent to 500 subscribers.
When you upgrade from a free to a paid plan, you can access ConvertKit’s core features (automation and sequences).
You will also get access to free training to get started. They provide all the marketing tools to succeed in email marketing.
How long is Kit’s free trial?
The Kit free trial is 14 days. After that period, you will be charged for the plan you selected. The plan starts from $29 per month for up to 1,000 subscribers.
If you have any questions about the tKit tutorial, kindly let me know through your comments.
Does Kit have a landing page?
It has a landing page that can help users design their landing pages to build an email list. Users can also use the forms to collect the details of their customers and create a list.
Is Kit suitable for e-commerce?
Yes, the email marketing service is suitable for an e-commerce business. You can use it to sell both physical and digital products.
NOTE: You can now get a free life account without paying fees. However, this may not be good for your business if you want to automate your email marketing to grow faster.
Is Kit Email Marketing Worth The Price?
Yes,it is worth the price. And I will state the reasons below to justify my claim. Below are some reasons Kit is worth the price for me.
Email segmentation and sequence

One of the main features of the Kit that drove me to the tool is its user-friendly interface and ability to segment my email list and send emails in sequence.
It makes it simple to create segments based on interest so that only people who are interested in email will receive it.
Based on the Kit feature, I can organise my subscribers based on their interests. This will increase both open and click rates.
Tagging
It helps me ensure that my email campaign reaches the right people and streamlines my workflow. It also allows me to set up automation and tags to reach targeted people.
Seamless Integration

The introduction of Kit software enhances its features. It simplifies integrating with another tool to help my business in every aspect. I can integrate with the following tools:
Creating Landing Pages
The Kit’s landing page builder is outstanding. I thought it needed improvement, but designing a high-converting page to sell digital products and build lists is not too bad.
It has well-designed landing page templates that I can easily customize and use for my business.
Customer Support
When it comes to support, Kit goes beyond customers’ expectations. They help in any area to ensure customer satisfaction.
There are more benefits to using Kit for my email marketing business, and I never regret it.
Best Kit Alternatives
GetResponse Tool: This is another great marketing tool for growing your online business. It comprises all marketing tools in one place, such as landing pages, CRM, email marketing, webinars, sign-up forms, and more.
What I like most about the GetResponse tool is that it is not expensive. You can get a 30-day free account and later upgrade to a monthly subscription for just $15.
You can also access the free account for life without paying any fees. For more information, check the Getresponse pricing plans.
HubSpot is a complete automation tool that includes email marketing, CRM, sales funnels, and other packages such as web hosting, meeting tools, messages, etc.
If you want to learn more about HubSpot, you can check the Hubspot pricing to see what it will cost you.
Another Kit alternative is GoHighLevel.It is an all-in-one marketing platform for agencies and marketers.
Another email marketing platform is the Constant Contact tool. It has advanced features like Kit. But it can be compared when it comes to automation.
How To Get Started With the Kit.com Email Marketing Tool
Now that you understand the price of the new Kit email marketing solution, let’s examine its features and learn how to get started.
From my experience, you will be taken to the dashboard when you first sign up for an account with Kit email marketing.
Go to the Kit’s homepage, and click Start a free trial.

On the next page, confirm you’re not a robot.
Add your name, email address and password, and tick I have read the Kit terms of service.

Then click on Get Started.
On the dashboard, at the top, there are FIVE categories, which are:
- Subscribers
- Automation
- Landing Pages
- Sequences
- Broadcast
Subscribers: It shows the list of subscribers in your account.
Automation: Kit automation is connecting your form with an email sequence. It moves the subscribers who subscribe through the form to an email sequence.
For example, if you create an automation by a form named BLOGGING, the only subscribers who will enter that automation are those who sign up for that blogging after the visual automation was created.
Landing Pages/Forms: This page collects information about your visitors, such as their name and email address. You can start creating your first landing page by selecting any template.
Sequences: Sequences are sets of automated emails you send to your subscribers at specific times. They are also called autoresponders, where you can set up an email that goes to the subscribers automatically based on time and day.
Broadcast: A broadcast is typically an email message you send for one-off emails on a specific date and time and may not be intended to be reused multiple times.
Now that you understand all the terms, you can create your first campaign or form and connect it to the sequence.
If you’re looking for an all-in-one tool to build a premium community, sell courses, and grow your business, you may want to check the Communi community builder.
Related Post
- GoHighLevel Review
- GoHighLevel Pricing
- Best sales CRM
- Email Secret System
- Clickfunnels 2.0 pricing
- PLF Program
- Systeme.io
Oyundoyin Anthony is a blogger and an affiliate marketer that offers helpful contents to people who are looking for different products for their needs. He enjoys helping people to achieve success in their business.